Cinema 4D’s Team Render is a network rendering concept that uses peer-to-peer communication to distribute render tasks. This approach eliminates the bottleneck typically found at a central server, allowing assets required for rendering to reach each client more quickly. This results in significant speed improvements for both animations and still frames.
Key Components
- Peer-to-Peer Communication: Team Render uses a decentralized data exchange, where each client communicates directly with other clients to distribute render tasks. This approach ensures that assets are transferred quickly and efficiently.
- Team Render Server: For larger studios, the Team Render Server combines the benefits of a traditional client-server architecture with the decentralized data exchange of Team Render. This allows users to control all render jobs via a web interface, upload, monitor, and control network rendering jobs, and view log status messages from the server and all clients.
- Command Line Render Client: For users with render jobs that exceed the capacity of individual workstations or Team Render, the Cinema 4D Command Line Render Client can be used to create dedicated render farms. This client uses Cinema 4D’s render functions and is managed by third-party render farm admin tools.
How Team Render Works:
- Main Machine: One computer acts as the main render machine, coordinating the rendering process.
- Client Machines: Other computers on the network serve as render clients, each processing a portion of the overall render job.
- Task Distribution: The main machine divides the render job into smaller tasks and distributes them to the client machines.
- Result Compilation: As clients complete their tasks, the results are sent back to the main machine, which compiles them into the final output.
Setting up Team Render
The Team Render Server is part of any Cinema 4D license, and the matching Team Render Client can be installed on as many machines as needed without additional charges.
Remember that the exact steps and interface elements might vary slightly in different versions of Cinema 4D, as features and UI can change between versions.
- Network Setup
- Ensure all computers are on the same local network.
- Disable firewalls or configure them to allow Cinema 4D network traffic.
- Assign static IP addresses to avoid any issues with dynamic IP changes.
- Installation
- Master Machine: Install the full version of Cinema 4D.
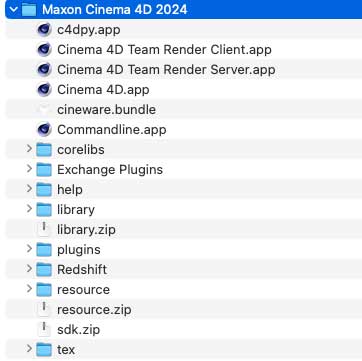
- Client Machines: Install the Team Render Client. This can be downloaded from the Maxon website or found in the installation directory of the full Cinema 4D installation.
- Make sure all machines are running the same version of Cinema 4D.
- Configure Team Render Server
- On each client machine, ensure the Enable Team Render option is enabled in the Preferences menu. To do this, open Cinema 4D and go to Cinema 4D > Preferences > Renderer >Team Render.
- Set a custom port if needed (default is usually fine).

- Set up the Main Render Machine
- Open Cinema 4D on the master machine.
- Go to Render > Team Render > Team Render Manager.
- In the Team Render Manager, click “Detect” to find available client machines on the network.
- Click the Add Machine button to add clients to your render farm.
- Enter the IP addresses and port numbers of each client machine.
- Ensure the status of each client is set to “Active”.
- Start Rendering
- Open your project in Cinema 4D on the master machine.
- Choose your output settings as usual.
- In the Render Settings, enable Team Render under the Render tab.
- Go to Render > Team Render to Picture Viewer to start a render job.
- Monitor Progress
- Monitor the progress in the Picture Viewer. The Picture Viewer will display real-time updates on the rendering process, including which frames or tasks are being processed by which client.
- You can monitor the progress and status of each client in the Team Render Machines dialog.
- Additional Tips
- Ensure all plugins and assets used in the project are accessible to all client machines.
- Regularly update Cinema 4D and Team Render Client to ensure compatibility and performance improvements.
- Use high-speed network connections to minimize data transfer times between the master and client machines.
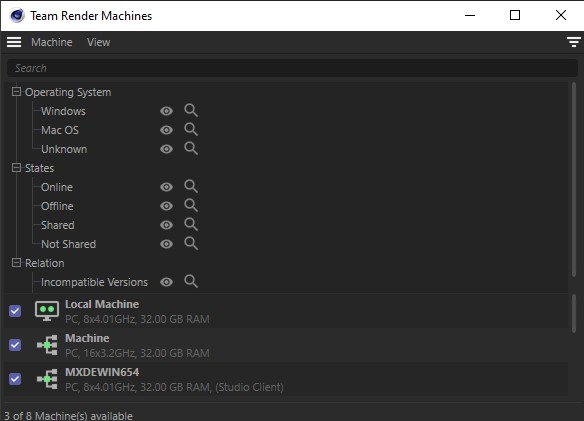
All verified (green) computers can take part in rendering.
Search bars and filters are shown in this image.
Render Only Licenses: Both Cinema 4D and Red Giant offer render-only licenses that can be used with command-line tools such as Deadline and Qube to distribute rendering tasks.
Setting Up Team Render for Older versions of Cinema 4D
- Licensing: Team Render does not require a unique serial number. Instead, users can use their Cinema 4D Broadcast, Visualize, or Studio serial number to license Team Render.
- Installation: To set up Team Render, you need to load your Cinema 4D installation disk or the ISO file provided. Follow the installation instructions to install the necessary components.
- Configuration: Configure Team Render by setting key preferences such as:
- Abort Rendering on Client Error
- Exclude Client on Rendering Error
- Handle Warning as Error
- Clients Get Assets on Demand
- Fetch Assets Always from the Server
- Peer-to-Peer Asset Distribution
- Repository Path: Choose a suitable location for the Team Render Server repository, considering factors such as storage capacity and network accessibility.
- Web Interface: Use the web interface to monitor and control render jobs, view log status messages, and manage the render process.
Tutorials and Resources
For a detailed walkthrough of setting up Team Render, refer to the following resources:
- Team Render in the Cinema 4D User Guide
- Team Render on Maxon Help Docs – If you need to troubleshoot Team Render, check these help docs.
- Cineversity Team Render Series – Rick Barrett created a comprehensive tutorial series covering the installation, configuration, usage, and troubleshooting Team Render.
CINEMA 4D – Render: Team Render (Setup)
Step-by-step guides on setting up Team Render, including a detailed walkthrough and a basic introduction. This video is 10 years old but is still linked from the Maxon help docs.
Cinema 4D: Team Render Server
Team Render Server lets you directly upload, monitor, and control your network rendering jobs, and view the log status messages from the server and all clients.
Cinema 4D Team Render Client Quick Start Guide
./ Steak’s Docs has a step-by-step Quick Start Guide for setting up the Cinema 4D Team Render Client.
More Resources
Render Network Wizard for Cinema 4D
Dino Muhic has a script called Render Network Wizard for Cinema 4D.
Once launched users can upload .c4d project files to the network. This removes a step for the clients which so far had to export to the Octane specific .orbx file format and also unlocks support for Standard Renderer and Physical, and Redshift by Maxon being supported soon, besides the already fully productive OctaneRender support.
Dino Muhic, Render Network Wizard for Cinema 4D
PV Render Queue
PV RenderQueue is a free Cinema 4D Plugin that allows you to queue render jobs and render them directly in the Picture Viewer using the external or Team Render.
Custom Tokens with Team Render Server – from the Maxon Developer’s forum
'%3e%3cg id='Final-Copy-2_2_' transform='translate(1275.000000, 200.000000)'%3e%3cpath class='st0' d='M7.4,12.8h6.8l3.1-11.6H7.4C4.2,1.2,1.6,3.8,1.6,7S4.2,12.8,7.4,12.8z'/%3e%3c/g%3e%3c/g%3e%3c/g%3e%3cg id='final---dec.11-2020'%3e%3cg id='_x30_208-our-toggle' transform='translate(-1275.000000, -200.000000)'%3e%3cg id='Final-Copy-2' transform='translate(1275.000000, 200.000000)'%3e%3cpath class='st1' d='M22.6,0H7.4c-3.9,0-7,3.1-7,7s3.1,7,7,7h15.2c3.9,0,7-3.1,7-7S26.4,0,22.6,0z M1.6,7c0-3.2,2.6-5.8,5.8-5.8 h9.9l-3.1,11.6H7.4C4.2,12.8,1.6,10.2,1.6,7z'/%3e%3cpath id='x' class='st2' d='M24.6,4c0.2,0.2,0.2,0.6,0,0.8l0,0L22.5,7l2.2,2.2c0.2,0.2,0.2,0.6,0,0.8c-0.2,0.2-0.6,0.2-0.8,0 l0,0l-2.2-2.2L19.5,10c-0.2,0.2-0.6,0.2-0.8,0c-0.2-0.2-0.2-0.6,0-0.8l0,0L20.8,7l-2.2-2.2c-0.2-0.2-0.2-0.6,0-0.8 c0.2-0.2,0.6-0.2,0.8,0l0,0l2.2,2.2L23.8,4C24,3.8,24.4,3.8,24.6,4z'/%3e%3cpath id='y' class='st3' d='M12.7,4.1c0.2,0.2,0.3,0.6,0.1,0.8l0,0L8.6,9.8C8.5,9.9,8.4,10,8.3,10c-0.2,0.1-0.5,0.1-0.7-0.1l0,0 L5.4,7.7c-0.2-0.2-0.2-0.6,0-0.8c0.2-0.2,0.6-0.2,0.8,0l0,0L8,8.6l3.8-4.5C12,3.9,12.4,3.9,12.7,4.1z'/%3e%3c/g%3e%3c/g%3e%3c/g%3e%3c/g%3e%3c/svg%3e) Your Privacy Choices Notice at Collection
Your Privacy Choices Notice at Collection